
menu

Taking it all the way back to Pinterest 101: Pinterest is a visual search engine, so while Pinterest SEO is still so important for getting your content to rank, the Pinterest pins themselves are the driving force. The images and graphics are what people see when they scroll. They are what get people to click closer and then the ultimately want more and head to your blog. In order to get people to your website where you can convert into community members or make sales, you need them to be intrigued by your pins.
With social platforms, the “a” word can be stressful, but the Pinterest algorithm is much more easily controlled and trained. Posting fresh pins is key to getting love from the algorithm, but fresh pins can mean new graphics or images to the same URL.
A common mistake I see is people just posting one image or graphic to one blog post and calling it a day. Instead, you should be making multiple images (in fact, the limit does not exist for how many) and spacing them out to post throughout the month. This is how you can get Pinterest blog traffic without reinventing the wheel or writing another 2,000 word blog post.

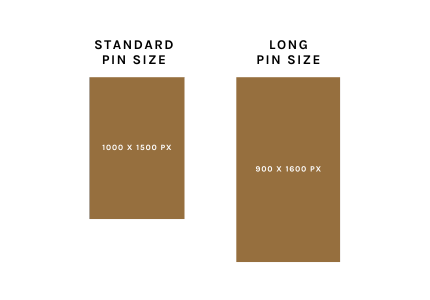
When it comes to the basics of designing a pin, you need to know all the details and formats available. The first sizing guide you need to know is that a 2:3 pin ratio is preferred. The standard pin size is 1000 X 1500 px, but that’s not to say that’s the only pin size you can use.
I like to have both standard pins and long pins as an option for my clients. Taking up more real estate on a person’s screen can help you capture people’s attention faster, which has been my reasoning for playing with long pins. Depending on their mood (not really, but it feels that way), Pinterest sometimes decides to hide the full long pin. That means a user must click to enlarge the pin to see the full thing. Just something to keep in mind when deciding on your graphics’ pin dimensions
Next up is learning the different formats and types of pins you can create. There are 3 main formats when it comes to pin design and how they are coded.
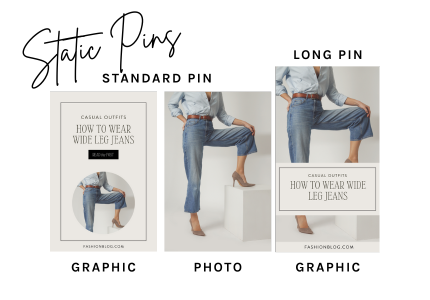
Static pins are the most common on Pinterest. They are the photos and text overlay graphics (or “custom branded pins”) that you see most everyday users and business share. These are the best types of pins for getting outbound clicks/traffic to your blog from Pinterest. These are not optional if you want to succeed on Pinterest.
We’ll get into how to design these properly and different tools to help you create effective static pins later in this post.
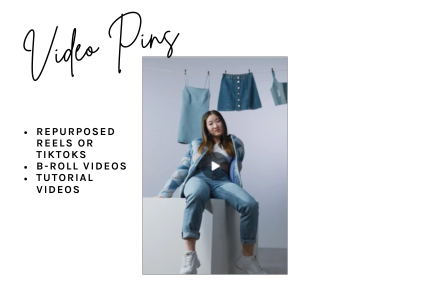
Video pins work similarly to static pins, in that they are just uploaded media and have links out to your blog. They can be scheduled on Tailwind.** (that is an affiliate link where I’d make a commission, should you sign up). They can also be uploaded in Pinterest itself and posted.
I prefer to use this feature as a way to repurpose videos from Instagram and TikTok that are relevant and Pinterest-friendly (aka searchable and useful for the user rather than connection content). I don’t currently believe in creating video specifically for Pinterest, as a blogger. The return on your time investment isn’t there. Often videos get high impressions, but low outbound clicks. When the goal is traffic to your blog… video pins are less of a main part of the strategy. I like to experiment with them and use them as a way to get more Pinterest “love” (impressions, saves) that often helps the static pins get more opportunities to be seen.
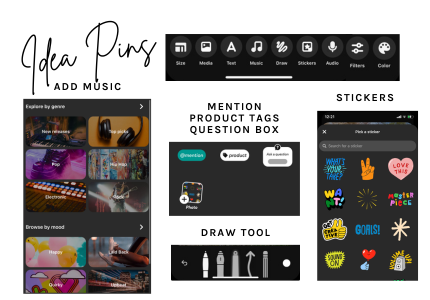
Idea pins are probably the most confusing type of pin. They are more about the technical coding of a pin then anything else. Idea Pins are just pins created in the specific Pinterest tool that are often video pins plus some extra features or edited on the platform itself.
Formerly, these pins were called “story pins” and they functioned more like a carousel on Instagram. They had multiple slides that you clicked through.

Some of the options you currently have when creating Idea Pins inside the pin creator tool:
Here’s the thing about Idea Pins… they’re very much encouraged by Pinterest, but Pinterest educators and strategists still seem split on if they have a positive, neutral or negative effect on an account.
Collage pins are the newest Pin format to Pinterest. They make a lot of sense for the average Pinterest user, because we are the type to love a collage. At least, I am certainly inclined to use them, BUT they aren’t yet tested for business enough for them to warrant being a part of your strategy. If I had to guess, they probably do not do much in terms of growing traffic to your site because there are too many links in one Pin to have a clear call-to-action. It also takes a couple steps to get from the big collage to a piece of the collage to the pin in the collage to the link that pin clicks out too.. that’s a lot to ask.
There is a world where you can make incredible collages out of all your own content and that POSSIBLY being a traffic driver to your blog, but I don’t think we’re in that world yet. I don’t feel that’s natural for users to click through yet. I assume collage pins get all the saves and none of the outbound clicks.

That being said, if you have time and interest in making collage pins… go for it! I would recommend using all your own pins and making the main link URL one that’s a roundup with all of those or some sort of relevant compilation.
You can also look into remixing collage pins and the different ways you can share them on social media (the latter is interesting to me and something that might be useful for cross-promotion).
Now that we know the different types and my preference for formats (based on what actually gets you traffic to your blog), let’s talk about how to create high-performing Pinterest pins. From consistently performing pin graphics styles to viral pins that raise your stats for months, doing well on Pinterest is SO feasible.
Now might be a good time to remind you that virality on Pinterest is actually a good thing. Like going viral everywhere else, it will inflate your results temporarily, but, unlike going viral everywhere else, virality can compound. Your pin can and will stay getting traffic for months or years if it’s evergreen content. It could also go viral every season (i.e. a bathing suit post might resurface every spring).
There are several ways a pin starts to rank high in search results, therefore rendering it a pin that gets seen and gets consistent, high engagement. The one we’re going to focus on today is its looks. Creating high-performing Pins starts with the Pin visuals.
Let’s get creating static pin templates for you that are on-brand and effective!
Quick Intermission to let you know I do design custom Pin templates for bloggers… it’s a service I provide because it’s fun, but it’s not on my service list. If you’re interested, just shoot me an email at info@kaylawatkins.com.
The first place we’re going to head is to Canva. Canva is the GOAT of design. It’s intuitive and has so many tools and features we’re going to use when creating Pin templates.
Start by creating a Pinterest Pin (a canvas they already have available at the standard pin size of 1500 X 1000 px).

Next, you’ll start working on your first pin template, but the beauty of Canva is that you don’t need to start from scratch. You can go the menu on the left side of the screen and select “Design” and right away start seeing Canva Pinterest templates you can use:

Start by scrolling through and selecting some of the templates you like. You can “add as a new page” as many as you’d like AND you can see more from the template creator if the style is your vibe. All you have to do is hover over the image, click the 3 dots and then click “view more by [artist name].” This is a great way to get more templates that a similar vibe to complete your template set.

The goal is to design 4 pin templates, and we want the pin templates to all be slightly different in style. We don’t want 4 pin styles that are are all heavy on the text or all multiple photos. We want to mix it up to see what performs best for our content.

Once you’ve selected 4 or more Pin templates to start from… it’s time to make them cohesive. We want them to be cohesive with each other and with your business’ brand. Switch out fonts and colors to make it match the aesthetic of your blog. Add your logo and website to represent your brand.
Next, head back up to the “10 top tips for Pinterest pins design” to make sure your Canva Pinterest templates have everything else I recommended including a call to action.
Finally, put these templates to work for one blog post in order to make sure they can be used as intended. Select your most recent blog post, swap out the images for your own photos and swap out the text for Pinterest SEO-friendly text overlay that relates to the blog content. See for yourself how easy designing Pins can be. That’s 4 pins for one URL (not to mention your photos can be standalone static pins as well).
Troubleshooting on Pinterest is tricky. If your Pins aren’t getting traction (meaning aren’t getting outbound clicks), your Pin design isn’t always the reason. Most commonly, your Pinterest SEO needs work BUT there are some scenarios where it’s clearly a Pin design issue.
If you’re getting either of these two things happening, I would look at Pin design:
The former tells me Pinterest is understanding the content. It’s showing it in feeds and search results, but people aren’t interested in clicking on it. The latter tells me, people don’t see the need to click through. They get all they need from the pin itself without going to your blog.
Check out the blog for more Pinterest marketing tips and insights into blogging as a career. Reach out if you want help making branded templates. If you need help optimizing your Pinterest profile or running your Pinterest account in general!


[…] The Anatomy of A Good Pin […]
[…] The Anatomy of A Good Pin […]